
Getting Started with VirtualBox - Part I
- Rashaun Hoskey
- Jan 23, 2024
- 6 min read


In cybersecurity, trying to develop skills requires a dedicated space to experiment, innovate, and explore resources. I previously touched upon the foundational components of a well-rounded home lab in my Building a Home Lab post. However, this time, let's dive deeper a little further into virtualization by setting up a virtual environment using VirtualBox.
This free and open-source software transcends the limitations of physical hardware, transforming your personal computer into a multiverse of digital potential. Imagine effortlessly running Windows 11, Ubuntu Linux, and Kali Linux side-by-side, all on a single machine. VirtualBox grants you the power to test software, dissect operating systems, and build intricate IT infrastructure, all within the safe confines of your own virtual playground.
Building a robust home lab with VirtualBox may seem daunting at first glance. This guide will walk you through the installation process with crystal-clear precision. We will not be running any machines just yet in this guide, we will do that later in the Part II to this post, for now we will focus on getting the program installed and learning about the different networks modes.
Download VirtualBox
For this guide I will be installing VirtualBox on to Windows 11, if you are running a different OS I recommend visiting VirtualBox Documentation to double check your systems requirements before installation.
This guide uses VirtualBox 7.0.14
To get started, download VirtualBox here.
Install VirtualBox
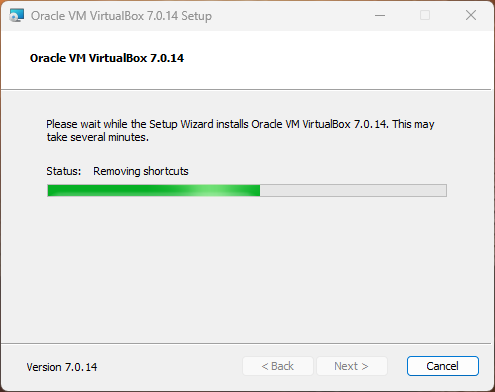
Once you have downloaded the VirtualBox installer, run the .exe.
Click Next > to continue.

Select your desired install location by clicking Browse, then click Next > to continue.

The installer then will warn you that it will interrupt your internet connection briefly, click Yes to continue.

The installer may tell you that it is missing Python dependencies, these will have to be set up manually later, click Yes to continue.

Now you are ready to install, click Install to continue.

The program will begin installing VirtualBox, this should take no more than 5 minutes to complete.
If you wish to run the program immediately after the installer closes, check the box Start Oracle VM VirtualBox 7.0.14 after installation. If not, you will run VirtualBox from the newly created desktop icon. Click 'Finish'

The install is now complete!
VirtualBox Overview & Settings
The first time you run VirtualBox you will see a window similar to the one in the first image below. Yours will be blank and will not have any machines listed since that has to be done separately. We will go over installing machines in the Part II post. However I do want to go over a few things that you should be familiar with before the next post.
This is the Graphical User Interface(GUI) for VirtualBox, the main window where you will find information about all of your installed machines. This is also where you can make edits to the setup of the machine.

The tray on the left is where you will see all of your installed machines. Once they are installed, they will be available here every time you run VirtualBox unless you remove them.
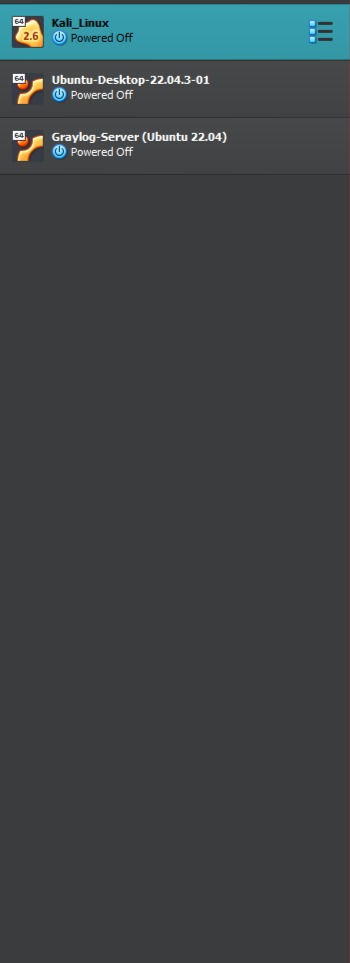
The tray on the right is where you will see all information about the machine you have currently selected.

This is the settings window, from here you will be able to change what would normally be the physical components of the selected machine. Think of this as your person free PC parts store.

We will go over basic system requirements on the Part II to this post, but for now I would suggest familiarizing yourself with the Network tab. This is where you will set up how your machine will communicate to the host, to each other and to the internet. We will go over this in a little more depth at a later time.

VirtualBox Networks
As I mentioned previously, I suggest that you spend some time reviewing the networks tab under settings. The network settings are where a lot of the "issues" I run into using virtualization stem from, so take your time to review the information in this section. If you are not already familiar with network infrastructure and protocols, here would be a good place to pause and review.
There are 6 main network modes to choose for your virtual machine in VirtualBox.
Not Attached
In this mode, VirtualBox reports to the guest that a network card is present, but there is no connection. This is as if no Ethernet cable was plugged into the card. Using this mode, it is possible to pull the virtual Ethernet cable and disrupt the connection, which can be useful to inform a guest operating system that no network connection is available and enforce a reconfiguration.
Network Address Translation (NAT)
This the simplest way of accessing an external network from a virtual machine. Usually, it does not require any configuration on the host network and guest system. For this reason, it is the default networking mode in VirtualBox.
A virtual machine with NAT enabled acts much like a real computer that connects to the Internet through a router. The router, in this case, is the VirtualBox networking engine, which maps traffic from and to the virtual machine transparently. In VirtualBox this router is placed between each virtual machine and the host. Virtual machines cannot talk to each other by default, thus separation maximizes security.
The disadvantage of NAT mode is that, much like a private network behind a router, the virtual machine is invisible and unreachable from the outside internet. You cannot run a server this way unless you set up port forwarding.
NAT Network
This service works in a similar way to a home router, grouping the systems using it into a network and preventing systems outside of this network from directly accessing systems inside it, but letting systems inside communicate with each other and with systems outside using TCP and UDP over IPv4 and IPv6.
A NAT network is attached to an internal network. Virtual machines which are to make use of it should be attached to that internal network. The name of the internal network is chosen when the NAT network is created and the internal network will be created if it does not already exist.
Bridged
With bridged networking, VirtualBox uses a device driver on your host system that filters data from your physical network adapter. This driver is therefore called a net filter driver. This enables VirtualBox to intercept data from the physical network and inject data into it, effectively creating a new network interface in software. When a guest is using such a new software interface, it looks to the host system as though the guest were physically connected to the interface using a network cable. The host can send data to the guest through that interface and receive data from it. This means that you can set up routing or bridging between the guest and the rest of your network.
Internal Network
Internal Networking is similar to bridged networking in that the VM can directly communicate with the outside world. However, the outside world is limited to other VMs on the same host which connect to the same internal network.
Even though technically, everything that can be done using internal networking can also be done using bridged networking, there are security advantages with internal networking. In bridged networking mode, all traffic goes through a physical interface of the host system. It is therefore possible to attach a packet sniffer such as Wireshark to the host interface and log all traffic that goes over it. If, for any reason, you prefer two or more VMs on the same machine to communicate privately, hiding their data from both the host system and the user, bridged networking therefore is not an option.
Internal networks are created automatically as needed. There is no central configuration. Every internal network is identified simply by its name. Once there is more than one active virtual network card with the same internal network ID, the VirtualBox support driver will automatically wire the cards and act as a network switch. The VirtualBox support driver implements a complete Ethernet switch and supports both broadcast/multicast frames and promiscuous mode.
Host-only
Host-only networking can be thought of as a hybrid between the bridged and internal networking modes. As with bridged networking, the virtual machines can talk to each other and the host as if they were connected through a physical Ethernet switch. As with internal networking, a physical networking interface need not be present, and the virtual machines cannot talk to the world outside the host since they are not connected to a physical networking interface.
When host-only networking is used, VirtualBox creates a new software interface on the host which then appears next to your existing network interfaces. With bridged networking an existing physical interface is used to attach virtual machines, however with host-only networking a new loopback interface is created on the host. And with internal networking, the traffic between the virtual machines cannot be seen, but the traffic on the loopback interface on the host can be intercepted.
See the graphic below from NAKIVO to help you visualize the way the different modes work.

You will see in the image below the Attached to: drop-down menu. Here you will be able to select all the network types.

For more information of networking in VirtualBox please refer to the manual here.
This dive into VirtualBox might feel intense, remember, each virtual machine you create is a stepping stone on your cybersecurity journey. Soon, you'll be wielding this powerful tool to dissect operating systems, test software like a seasoned analyst, and craft intricate networks. However, mastering virtualization requires a strong foundation and more importantly time.
While you await Part II's arrival, consider investing time in solidifying your understanding of networking concepts. This groundwork will ensure a smooth transition into what we will explore in the next chapter.

Comments